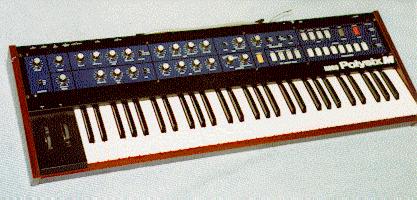
Ricard's MIDI retrofit for the Korg Polysix
Please note, these pages describe my original retrofit, built either
on veroboard or using Martin Wise's PCB designs. If you want
additional features not included in my original design, or don't want
to make the boards youself, consider getting
Johannes Hausensteiner's kit instead.
Specifications:
MIDI IN functionality: note on, note off, all notes off, bend wheel,
mod wheel, program change, sustain pedal, chord memory pedal, arpeggio
switch, clock, start and stop (for the arpeggiator), sysex program dump,
mode messages, active sensing.
See the MIDI specification for details.
MIDI OUT functionality: note on, note off, all notes off, bend wheel,
mod wheel, program change, sustain pedal, chord memory pedal, arpeggio
switch, sysex program dump, active sensing.
See the MIDI specification for details.
Individually selectable MIDI in and out channels 1..16. Omni on/off,
local on/off and poly/mono mode messages received.
Arpeggiator can sync to MIDI clock at one of eight different clock rates.
Arpeggiated notes sent over MIDI OUT.
Expands memory to 128 programs, grouped in 4 groups (1..4) of 4 banks
(A..D) of 8 programs (1..8)
Edit recall functionality.
Chord memory pedal can now function as sustain pedal (switchable). Pedal
polarity automatically detected when synthesiser is switched on.
Sysex dumps in banks of 32 or 128 programs can be sent and received.
128 program tape dump available, as well as 32 program format compatible
with the original Polysix.
Dual and triple voice capability: up to three voices can be layered on
the same note for fatter polyphonic sound.
8 selectable key assign modes.
What it doesn't do is
No real time parameter update, i.e. no sysex or control change messages
mapped to the knobs. If you want this, you should get
Johannes' kit instead, as I'm not planning any future software upgrades.
No velocity sensitivity. I've heard the Kenton interface can do this, but
only monophonically for all voices at the same time which seems a bit
pointless to me.
How to build it
Ok, cut the small talk and lets get over to the more technical details.
First, some potentially bad news: There are two versions of the KLM-366
circuit board within the Polysix, referred to as 'old production' and
'new production' in the service manual. (Unfortunately, it doesn't list
the serial number when they switched from one to the other.)
The 'old production' version is
easily distinguished by the addition of a small extra board called KLM-396.
This retrofit is designed for the 'new production' KLM-366, i.e.
without KLM-396. While there circuit is essentially the same,
and the MIDI retrofit should work in both cases, it is likely that some of the
patching descriptions won't be correct for the 'old production' board. Also,
judging from an 'old production' machine I saw once, you might have to
assert a bit more inginuity to fit the board in place, as the KLM-396
boards partly occupies the space where the retrofit CPU board should go.
(Better yet, sell the 'old production' Polysix to someone else and get
a 'new production' one instead. :-)
Ok. To start with, some user
documentation, namely the detailed MIDI spec and the
user's manual.
(Det finns också en svensk manual
tillgänglig for those of you who prefer it in Swedish.)
Basically, there are three main steps to putting all this together. First,
there's the CPU board, the small
S/H (analog) board, and finally a number of
modifications must be done to the synth itself.
You'll also find Martin's PCB artwork on these pages; please note that
he has made some slight changes to the design, so be sure to read his
accompanying notes carefully.
Check
here
for a list of the components needed. (If you choose to build Martin's
PCB design, you'll find a better list together with his artwork files).
After all the hardware has been built, you still need some software to
make it run. Email me
to get the EPROM file when you get that far!
Some conventions and pointers:
The Polysix circuit boards all have names like KLM-367, KLM-368 etc. All
references to existing components and connections are made using these
names. I've written a short
description of the various boards so you can
understand what's going on.
On pots, CW means Clockwise, and CCW means
Counterclockwise. I have used these abbreviations to refer to the two outer
connections on pots.
In my schematics, I use a ground symbol (thick horizontal line) not
to actually indicate chassis ground but as a 0V reference designator. All
ground symbols an a schematic are to be considered connected together and
brought out to a common 0V connection for the board, and not just wired
into any old ground point around.
Do you need the service manual? No, not really, allthough it's nice
to have around if you want to understand what's going on. Besides, you'll
find the adjustment procedure (most importantly, the tuning procedure)
here. Can I copy it for you? No, sorry, my copy is bad, and copying it
would just make it completely illegible. However, both the
adjustment procedure and other userful information, including
battery replacement (and PCB cleanup if the old one has leaked)
is available on the
Old' Crow's Synth Shop page.
Comments? Ideas? Questions?
Mail me!
This page is (c) Copyright 2000 by Ricard Wolf
Go to my
Polysix page.